Studio Pro User Guide
Studio Pro is intended for R&D and test engineers who need multi-device management and, on measurement-capable hardware, waveform visualization and data logging. Use Control Pannel for routine switching; choose Studio Pro for advanced monitoring and larger setups.
Tip
Complete the wiring steps in your product manual, then download Studio Pro. The application scans for devices automatically and displays the available channels on the Console.
Intended audience: General users of SmartUSBHub Pro devices, R&D engineers, and test engineers Applicable software: SmartUSBHub Studio Pro 1.0.0 and later compatible versions Document version: 20260724
1. Overview
SmartUSBHub Studio Pro is a desktop application for SmartUSBHub Pro programmable USB hubs. It provides per-port power control, USB data-line control, device configuration, firmware upgrades, and software updates. On measurement-capable models, it also provides real-time measurements, waveform visualization, and data logging.
You can use it for the following everyday tasks:
Turn the power of an individual USB port on or off.
Enable or disable the USB data lines of an individual port.
On measurement-capable models, view each channel’s voltage, current, and power.
On measurement-capable models, view voltage and current waveforms on the Real-Time Monitor page.
Save supported measurements as CSV files for analysis in Excel or other tools.
Configure interlock mode, button lock, power-loss state saving, default channel states, and other operating modes.
Connect multiple SmartUSBHub Pro devices and control them from a single interface.
Check online for software and device firmware updates.
2. Installation and Startup
macOS
Double-click the
StudioPro-<version>-macOS-<architecture>.dmginstaller.Drag
StudioPro.appto theApplicationsfolder.Open SmartUSBHub Studio Pro from Applications.
Note
If macOS reports that it cannot verify the developer, allow the application under System Settings > Privacy & Security, or Control-click the app in Finder and select Open.
Windows
Double-click StudioPro.exe to run the application. If Windows displays a security confirmation, allow the application to run.
Before You Begin
Connect the SmartUSBHub Pro to the computer and make sure that the device is powered.
Wait for the operating system to recognize the device.
Open SmartUSBHub Studio Pro.
SmartUSBHub Pro communicates through a USB CDC serial interface. Windows 10/11, macOS, and common Linux distributions require no dedicated driver. On Windows 7, install the SmartUSBHub Windows 7 CDC Driver before connecting.
Important
If the device has separate control and data interfaces, connect them to the USB host according to the labels on the device. The control software must be able to access the control interface before it can detect and control the device.
3. Interface Overview
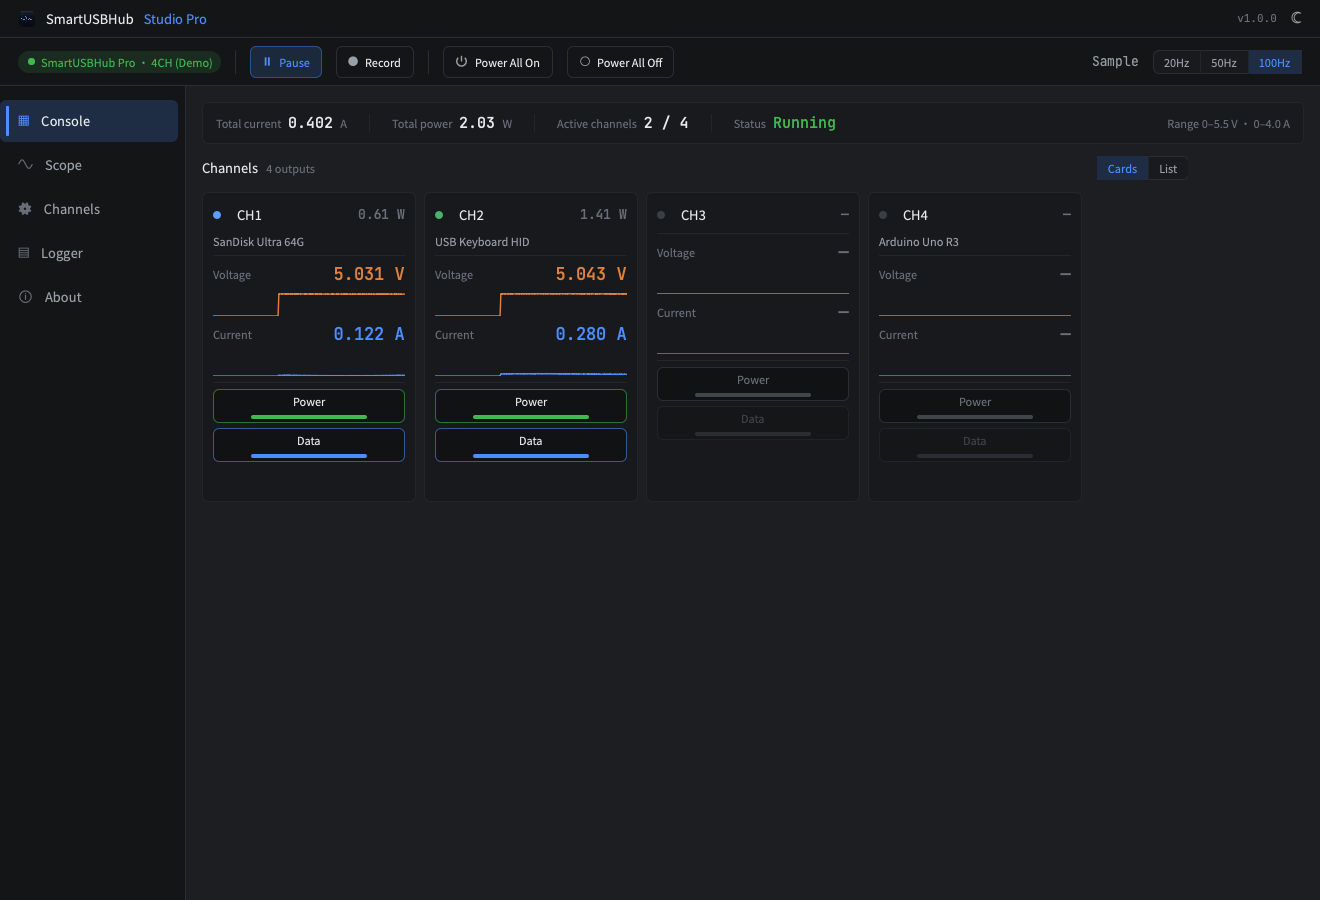
Figure 1: Console overview, with page navigation on the left and the global toolbar at the top.
Page navigation is located on the left, and the global toolbar is located at the top.
The main pages are:
Console: View all channel states and control the power and data lines of each channel.
Real-Time Monitor: On measurement-capable models, view voltage and current waveforms with zoom, pan, and auto-ranging controls.
Device Management: Configure default channel states, interlock mode, button lock, power-loss state saving, and device maintenance options.
Data Logger: On measurement-capable models, view live measurements in a table and record them to CSV files.
About: View software and device information, official links, the user agreement, and update controls.
Common controls on the top toolbar include:
Run/Pause: Pause or resume live updates.
Record: On measurement-capable models, start or stop CSV data recording.
All On/All Off: Control all channels on all connected devices at once.
Check for Updates: Open the update window from the About page to check for software and device firmware updates.
Use the theme button in the upper-right corner to switch between light and dark themes.
4. Connecting Devices
When the application starts, Studio Pro automatically scans for and connects to SmartUSBHub devices. After a successful connection, the connection status at the top displays the device model, while the device information area displays details such as firmware and hardware versions.
If no device is connected, the application remains in the disconnected state and continues scanning for a device. It does not generate simulated measurements during a normal launch.
To explore the interface with simulated data, launch Studio Pro explicitly with the --demo option. Demo mode never controls real hardware; close it and restart normally before connecting to a real test setup.
Multiple Devices
When multiple SmartUSBHub Pro devices are connected, the application automatically connects to all of them and displays their channels together. Channel labels include a device prefix, such as D1·CH1 or D2·CH3, so that channels from different devices can be distinguished easily.
Note
A single device can be disconnected and reconnected while the application is running. If you connect or disconnect devices in a multi-device setup, restarting the application is recommended so that all devices are enumerated again.
5. Controlling Port Power and Data Lines
Figure 2: The Console provides independent power and data-line control for every channel.
Each channel on the Console corresponds to one downstream USB port.
Turn Power on to supply power to the port.
Turn Power off to remove power from the port. The data-line switch is also disconnected, causing the downstream device to disconnect from the computer or power down.
Turn Data on to connect the port’s USB data lines.
Turn Data off to keep the port powered while disconnecting USB data communication with the computer.
Power and data lines are normally enabled together. To power a device without allowing data communication, leave Power enabled and turn Data off.
All On and All Off
Click All On or All Off on the top toolbar to control every channel at once. When multiple devices are connected, the command applies to all channels on all connected devices.
Caution
Before switching channels in bulk, confirm that all connected downstream devices can be powered on or off at the same time. Otherwise, active tests, firmware programming, or production processes may be interrupted.
6. Viewing Voltage, Current, and Power
This section applies only to models with voltage/current measurement, including SmartUSBHub Pro 4CH USB2.0 and HBP_USB2_7CH_ADV. The standard HBP_USB2_7CH does not provide measurement data.
Each channel on the Console displays its current voltage, current, and power, along with a miniature trend graph. The summary area at the top displays total current, total power, the number of active channels, and the current run state.
To examine the readings at a specific moment, click Pause. Click Run to resume live updates.
7. Viewing Real-Time Waveforms
The Real-Time Monitor requires a model with voltage/current measurement. It does not display live measurement traces for the standard HBP_USB2_7CH.
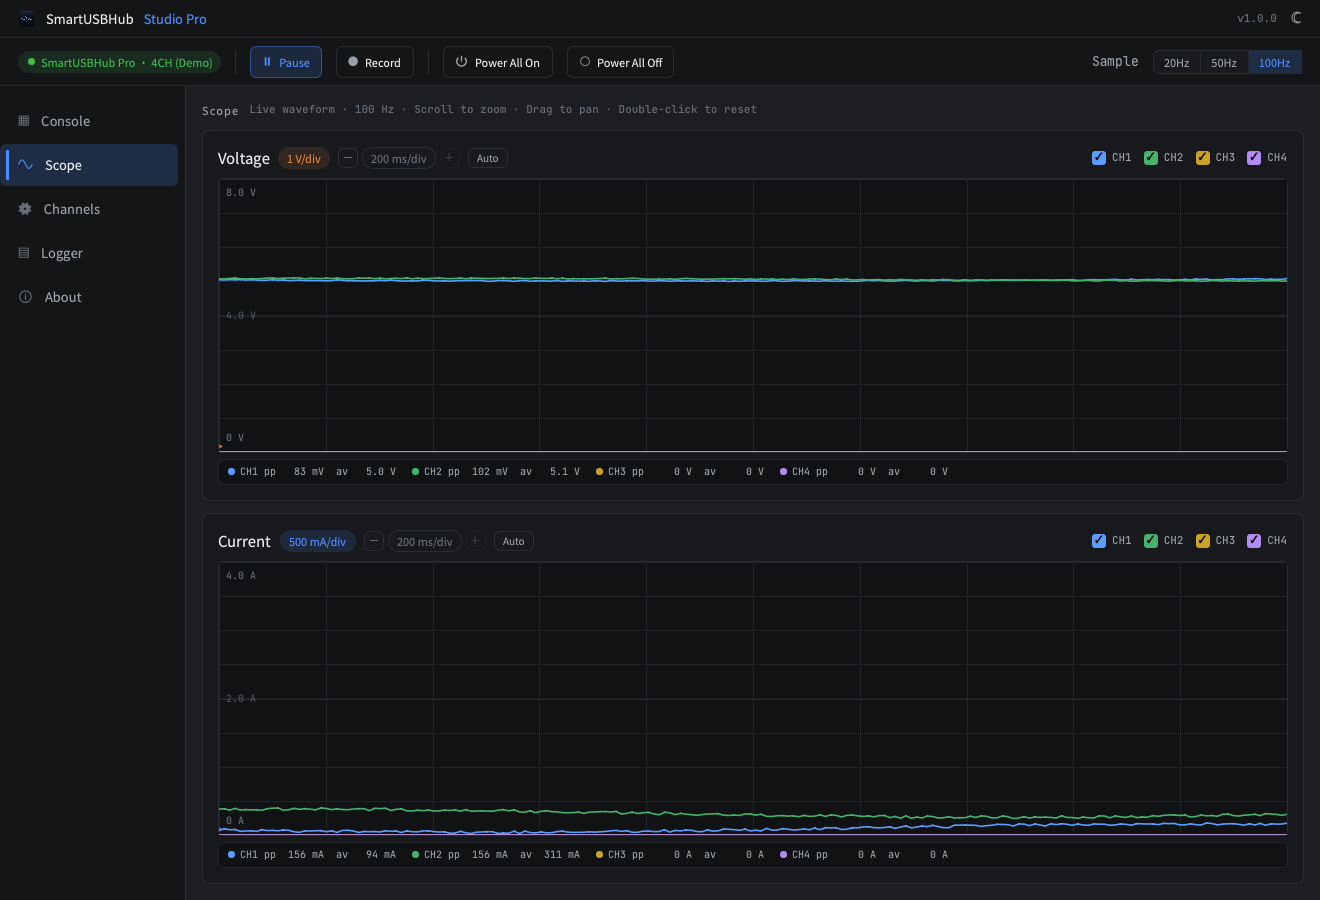
Figure 3: The Real-Time Monitor displays voltage and current waveforms.
The Real-Time Monitor shows how voltage and current change over time.
The upper plot displays voltage waveforms.
The lower plot displays current waveforms.
Channel selectors at the top or on the right can show or hide individual channels.
Use the mouse wheel to zoom the waveform.
Click and drag to pan the waveform.
Double-click the plot area to reset the view.
Use
V/div,mA/div, andms/divto adjust the vertical scales and time scale.Use Auto to select a suitable display range automatically.
The page also displays the peak-to-peak and average values of each waveform, making it easier to assess signal variation quickly.
8. Device Management
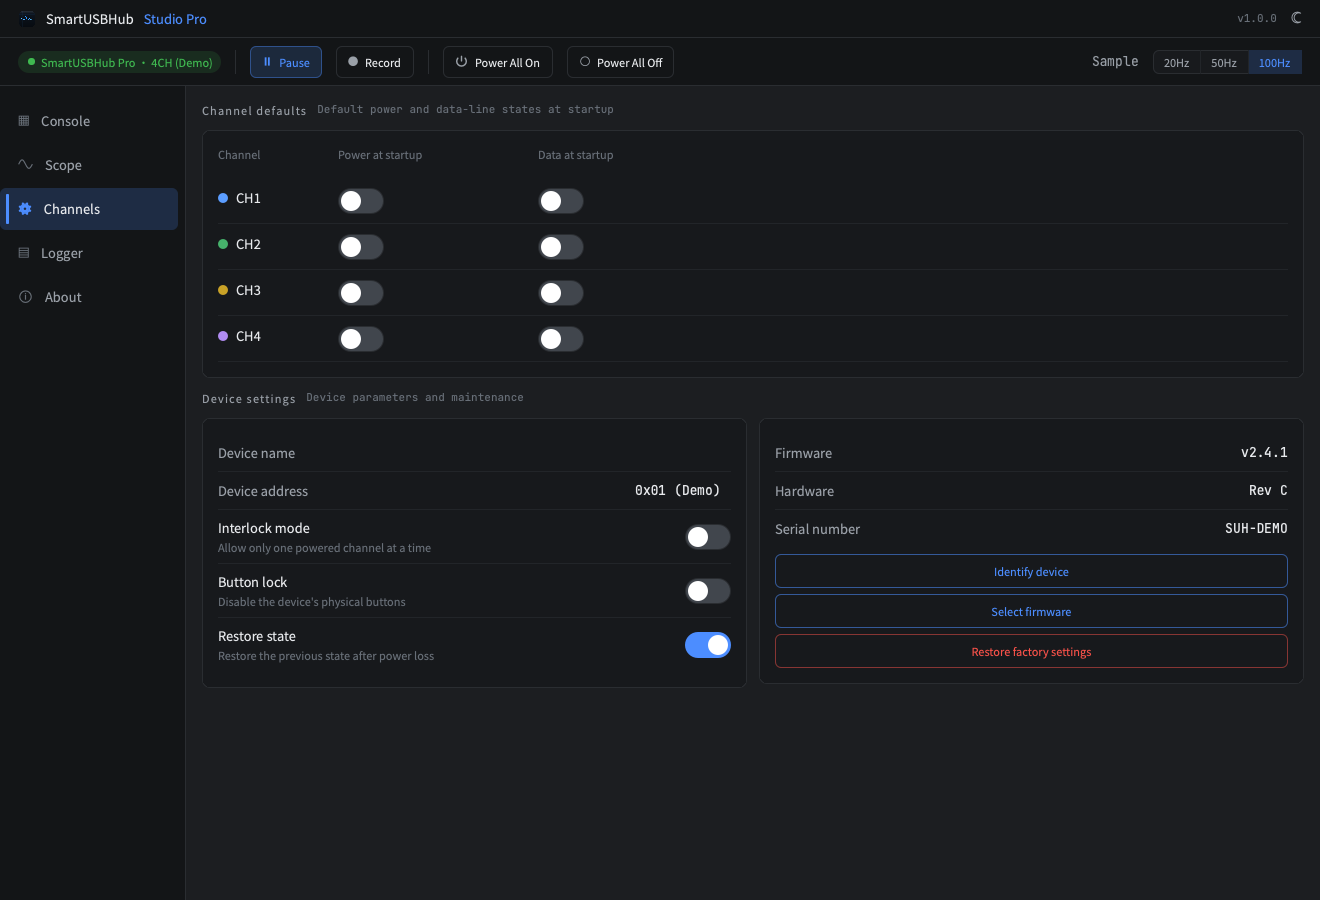
Figure 4: The Device Management page configures default channel states and device policies.
Use the Device Management page to configure how the SmartUSBHub Pro operates.
Default Channel States
You can set the default power and data-line states applied to each channel after the device powers on. This is useful for fixed test stations, automated processes, and production fixtures.
Interlock Mode
When interlock mode is enabled, only one channel can be powered at a time. Use this mode when multiple devices under test must never be connected simultaneously.
Save State on Power Loss
When enabled, the device saves the current channel states and restores them the next time it powers on.
Identify Device
When multiple devices are connected, use this function to identify the device currently being configured. After you click Identify Device, the corresponding device’s Sys indicator flashes rapidly for several seconds.
Factory Reset
A factory reset clears user settings stored in the device and restores the default configuration.
9. Data Logging
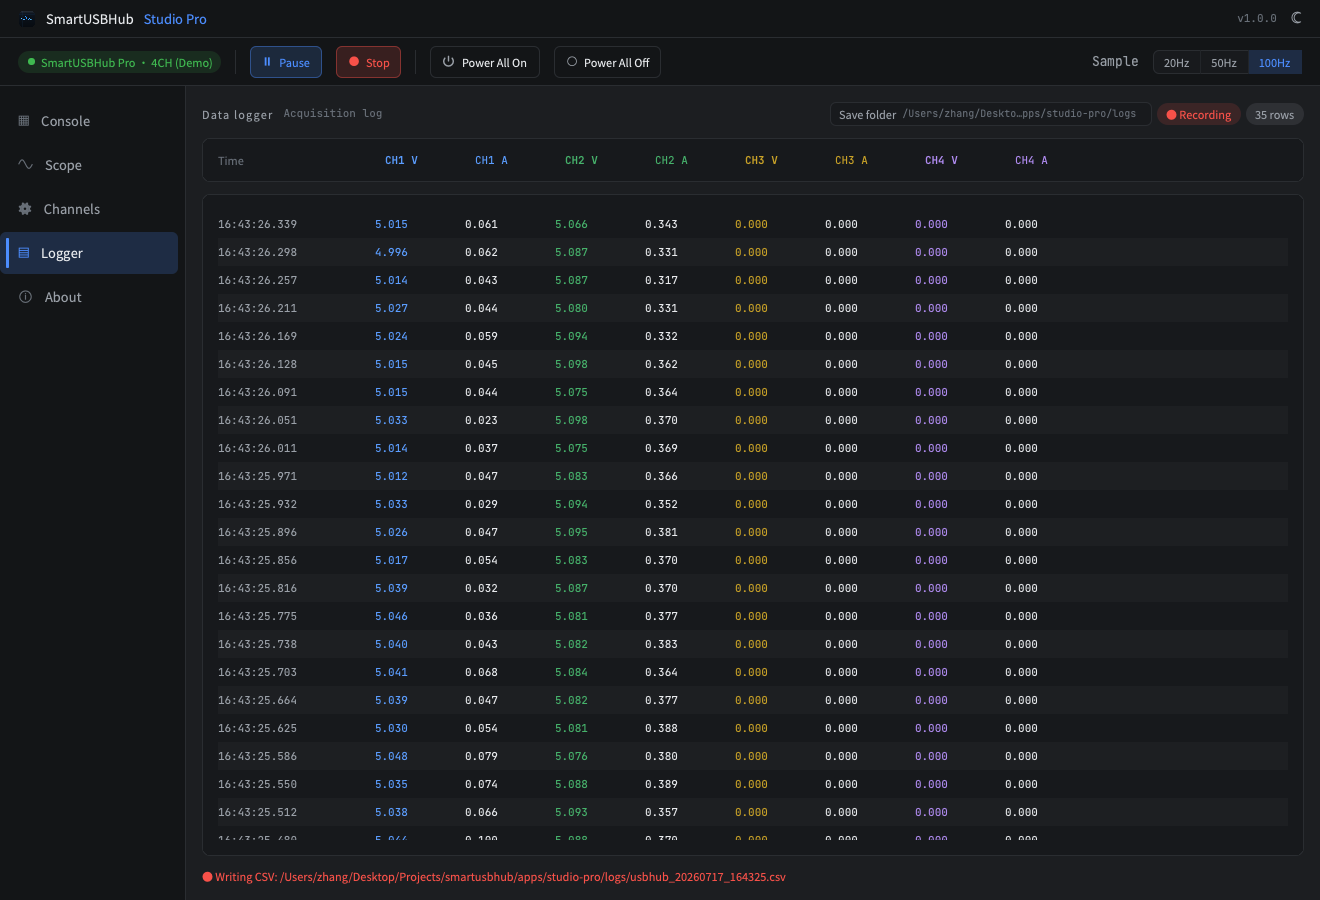
Figure 5: The Data Logger displays live measurements and records them to CSV files.
On a measurement-capable model, use the Data Logger to view live measurements in a table and save them to CSV files.
Click Save Directory to select the folder where CSV files will be stored.
Click Record on the top toolbar to start recording.
Click Stop Recording to end the recording.
If no save directory is selected, the application stores files in the logs folder by default. CSV filenames include the full date and time, and the files can normally be opened directly in Excel, Numbers, WPS Office, or data-analysis software.
10. Checking for Updates
Click Check for Updates on the About page to check for both:
Updates for SmartUSBHub Studio Pro itself.
Firmware updates for the currently connected devices.
If a newer software version is available, click Download and Install. The installer is downloaded to the system’s Downloads folder and opened by the operating system.
If new device firmware is available, click Download and Upgrade. After the firmware upgrade completes, the device restarts automatically, and the application attempts to reconnect and refresh the displayed version information.
Caution
Do not disconnect the device, close the application, or allow the computer to enter sleep mode during a firmware upgrade.
11. Local Firmware Upgrade
The Device Management page or update window may provide a local firmware upgrade option for installing a local .fw firmware file.
Online firmware updates are recommended for general users. Use a local firmware upgrade only when:
Official technical support has provided a specific
.fwfile.The update server is unavailable in an offline or restricted network environment.
You need to restore or test a specific firmware version.
After a firmware file is selected, the application checks its information and requests confirmation before starting the upgrade. Never force an upgrade if the firmware model does not match the connected device.
12. Troubleshooting
Device Not Found
Check the following:
Make sure that the device is powered.
Make sure that the USB cable supports data transfer.
Make sure that the device’s control interface is connected.
Check whether the operating system has detected the USB serial device.
Make sure that another serial tool, automation script, or older version of the application is not using the device.
Disconnect and reconnect the device, wait several seconds, and reopen the application.
The Hub Appears on the Console, but the Downstream USB Device Does Not
Check the following:
Make sure that Power is enabled for the corresponding channel.
Make sure that Data is enabled for the corresponding channel.
Check whether the downstream device requires additional power or startup time.
Make sure that the correct data interface is connected to the computer.
No Voltage or Current Readings
Confirm that the device model and firmware version support measurement functions. If a firmware upgrade has just completed, disconnect and reconnect the device, then restart the application.
Waveforms or Controls Do Not Refresh
Click Pause, then click Run. If updates still do not resume, restart the application.
Where Are Recorded Files Saved?
Files are saved to the logs folder in the application directory by default. You can select a different location by clicking Save Directory on the Data Logger page.
Update Check Failed
Make sure that the computer can access the internet, then try again later. Core device-control functions do not require internet access, so the application can still connect to and control devices if update checking is unavailable.
13. Safety Information
Do not disconnect USB, close the application, or allow the computer to enter sleep mode during a firmware upgrade.
Before controlling critical equipment, verify the channel number, device number, and channel name.
Before enabling interlock mode, power-loss state saving, or default power-on states, make sure that these settings are appropriate for the test or production process.
Before using All On or All Off, confirm that every downstream device is ready for the operation.
When the device is used for automated testing or production, validate the process first with no load or in a low-risk environment.
14. Support
Website: MixedSignalLab
Downloads: SmartUSBHub software downloads
Documentation: SmartUSBHub documentation
Sales: sales@mixedsignallab.com
Technical support: support@mixedsignallab.com
Store for customers in China: MixedSignalLab on Taobao
When contacting technical support, please provide:
The SmartUSBHub Studio Pro software version.
The device model.
The device serial number.
The firmware version.
The operating system version.
The steps that led to the issue.
© 2026 MixedSignalLab · SmartUSBHub Studio Pro